

Optionify is a free Shopify product options app that lets you add custom fields, choices, and add-ons to your products without fighting Shopify's variant limits. This guide explains what the app does, walks through the 17 option types, and shows you how to install it, enable the theme app embed, build your first option set, and preview it live.
What does the Optionify product options app do?
Optionify lets you attach custom options to products beyond Shopify's built-in variants. You group options into an option set, assign that set to the products it should appear on, and customers fill in their choices on the storefront. Everything a customer enters lands on the Shopify order.
Because Optionify options are independent of variants, you sidestep the 3-options-per-product limit that still constrains native Shopify even after the variant cap rose to 2,048. Personalization text, gift wrapping, delivery dates, and file uploads all live outside the variant system.
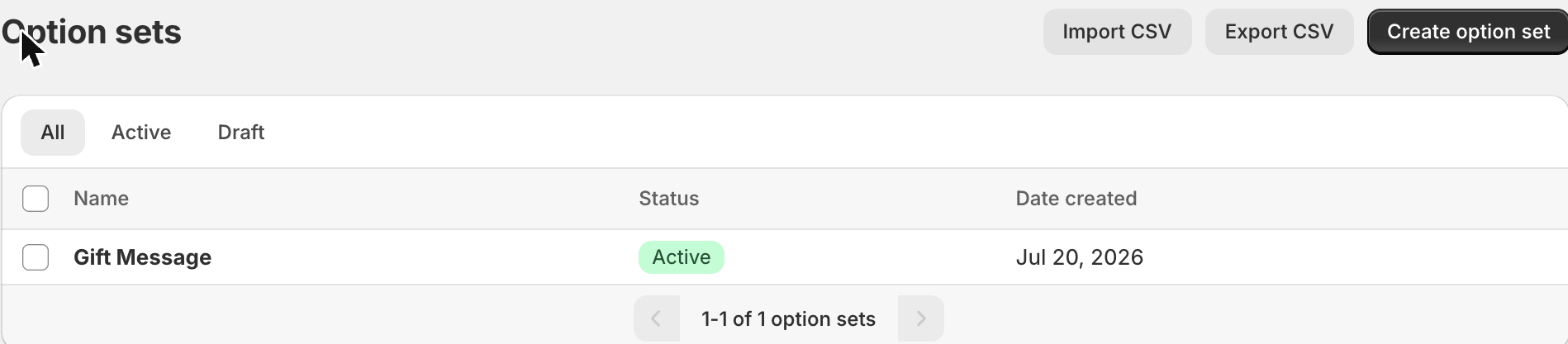 The Optionify home screen listing your option sets with their status and assignment
What are the 17 Optionify option types?
Optionify ships with 17 option types, all free. Choice types (dropdown, radio, checkbox, and similar) hold values you define; input types collect text, numbers, dates, or files. You mix any of them inside a single option set to build exactly the form your product needs.
- Text input — short custom text such as names or personalization
- Textarea — longer multi-line instructions
- Dropdown — select one choice from a menu (guide)
- Select box — a custom-styled single-choice dropdown
- Radio buttons — select one choice, shown more visually (guide)
- Checkbox — select multiple choices (guide)
- Switch — a toggle for add-ons like gift wrap or rush (guide)
- Number input — a numeric value such as quantity
- Email input — a validated email address
- Phone input — a phone number
- Date picker — pick a date, with range and blocked-weekday controls (guide)
- File / Image upload — customers upload artwork, logos, or photos (guide)
- Color dropdown — visual color selection with optional swatches (guide)
- Image swatch — visual selection using images like fabric textures
- Range slider — pick a number on a slider with a min, max, and step
- Dimension — width × height inputs with area-based pricing
- Product reference — link another store product as a choice
How do I install Optionify from the App Store?
Install Optionify like any Shopify app. Open the Optionify listing on the Shopify App Store, click Add app, and approve the permissions. Optionify needs product, order, and theme access so it can attach options, write choices to orders, and render on your storefront.
- Visit the Optionify App Store page.
- Click Add app, then Install to add it to your store.
- Approve the requested permissions to finish installation.
Installation is free, and there is no plan selection step. Optionify is free forever, so you land directly in the app with every feature unlocked.
How do I enable Optionify on my theme?
Options render through Optionify's theme app embed. In your Shopify admin go to Online Store → Themes → Customize, open the App embeds panel in the theme editor, toggle Optionify on, and save. Until the embed is enabled, your option sets will not appear on the storefront.
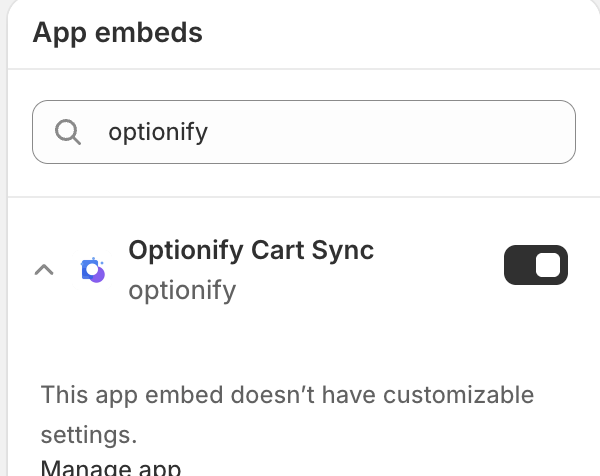 Enable the Optionify app embed in your theme editor so options render on product pages
This is a one-time step. Once the embed is on, every active option set displays automatically on the products it is assigned to, no theme code editing required.
How do I create my first option set?
Click Create option set in Optionify, give the set a name, add one or more options, and choose each option's type from the 17 available. For choice types, add the values customers pick from. Set the status to Active, then save with Shopify's save bar.
An option set is the core building block: a named group that holds your options and their values. You do not create options in isolation; they always live inside a set, which is what you later assign to products. For a full walkthrough with pricing and previewing, follow the creating your first product option tutorial.
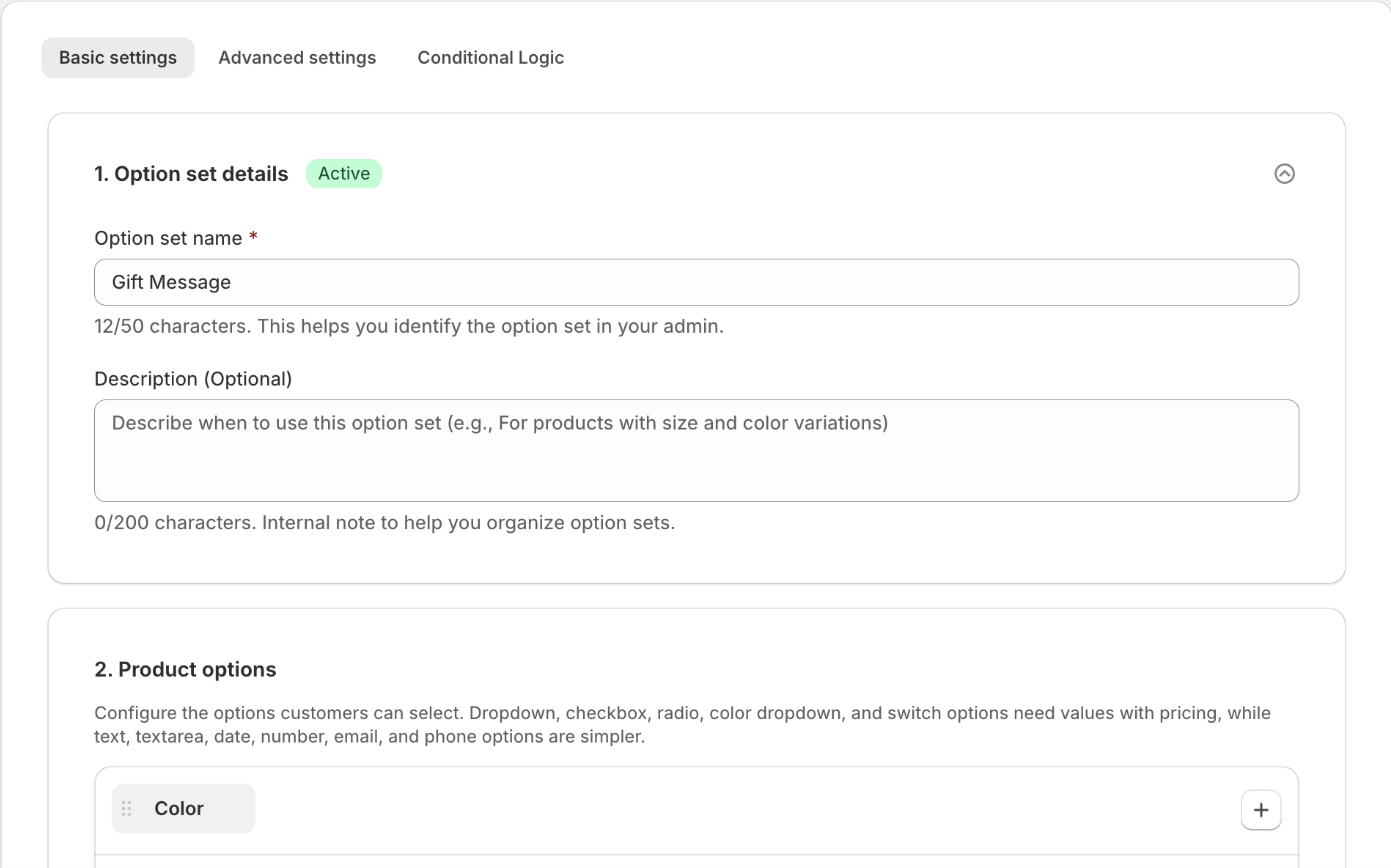 Naming an option set and adding an option with its type and values in the editor
How do I assign an option set to products?
Optionify offers four assignment methods that decide where a set appears: All Products, Tagged Products (any product carrying a tag you choose), Collections, and Individual Products. You set this inside the option set, so one set can cover your whole catalog or a single item.
Pick the method that matches your workflow. A "gift wrapping" set might target All Products, while an "engraving" set might target only a personalized tag or one collection. Read understanding assign types for guidance on choosing between them.
How do I preview options on the storefront?
Once your set is Active and assigned, use the Preview action in the editor. Optionify finds a product the set is assigned to and opens it on your live storefront so you can see the real rendering. Preview requires the set to be Active, since it loads the actual product page.
Previewing is the fastest way to confirm labels, values, and add-on prices look right before customers see them. If nothing renders, double-check that the theme app embed is enabled and the set's status is Active.
FAQ
Is Optionify really free? Yes. Optionify is fully free forever. Every merchant gets all 17 option types, all 4 assignment methods, conditional logic, and add-on pricing at no cost. There are no paid tiers, no premium plan, and no transaction fees on the options you create.
How do product options show on my storefront? Options render through Optionify's theme app embed. Open your theme editor, enable the Optionify app embed once, and every active option set appears on the products it is assigned to. If the embed is off, options will not display.
Do I need to create variants to use Optionify? No. Optionify options are separate from Shopify variants, so you avoid the 3-options-per-product limit entirely. You can add unlimited text fields, dropdowns, uploads, and date pickers without generating a single new variant or SKU.
Where does customer input appear after checkout? Every option a customer fills in is saved to the Shopify order as line item properties. Your fulfillment team sees the exact text, dates, uploads, and choices on the order detail page, so nothing gets lost between cart and packing.
How many products can one option set cover? As many as you want. A single option set can apply to All Products, every product with a chosen tag, whole collections, or a hand-picked list of individual products. One set can power your entire catalog or just one item.
Get started with Optionify
Optionify gives you 17 option types, visual conditional logic, and add-on pricing on a genuinely free plan. Install it, enable the theme app embed, and build your first option set in minutes.
Install Optionify free on the Shopify App Store
Next, follow the creating your first product option tutorial, learn where options appear in understanding assign types, and see why options beat variants in the Shopify variant limit guide.