

This tutorial shows you how to add a product option in Shopify using Optionify, from creating an option set to previewing it live. We'll build a gift-message field with an optional add-on charge so you see the whole real flow: create the set, pick a type, add values, price it, assign it, activate, save, and preview.
How do I add a product option in Shopify?
Open Optionify and click Create option set, name the set, add an option and choose one of the 17 types, add values for choice types, optionally set an add-on price, pick an assignment method, set the status to Active, and save with the save bar. Then use Preview to see it live.
Everything below expands on those steps. If you're brand new to the app, skim getting started with Optionify first so the terms below are familiar.
Step 1: Create an option set
In Optionify, click the Create option set button. This opens the option set editor, where all of your work happens. An option set is a named group that holds one or more options; you assign the set to products, not individual options, so it's the container everything lives in.
 Click "Create option set" to open the editor
Give the set a clear name such as Gift Message. The name is for your own organization in the option set list; customers never see it.
Step 2: Add an option and choose its type
Inside the set, add an option and choose its type from the 17 available. For our gift message we'll use Text input, which collects a short custom string. Choice types like Dropdown or Radio buttons hold values you define; input types like Text or Date picker collect what the customer types or selects.
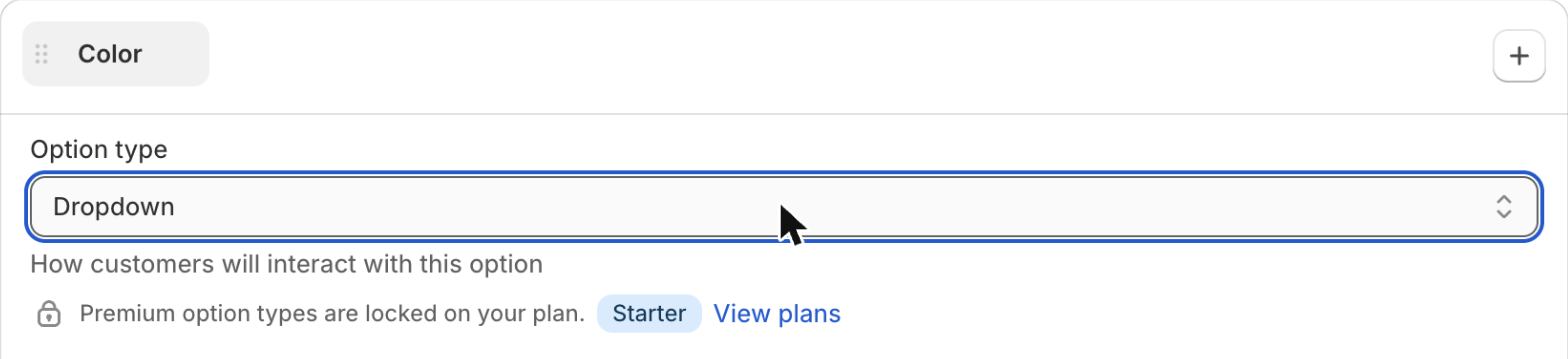 Selecting a type for the new option from the 17 Optionify types
Set a customer-facing label for the option, for example Gift Message. This label is what shoppers read on the product page, so keep it clear and indicate whether it's optional.
Step 3: Add values (for choice options)
If your option is a choice type such as Dropdown, Radio buttons, or Checkbox, add the values customers select from. Each value is one selectable choice, like Small, Medium, and Large. Text, number, date, and upload options don't use values, since the customer supplies the content directly.
For example, a "Wrapping Style" dropdown might have values Kraft paper, Gift box, and Ribbon only. Our Text input gift message skips this step because the shopper types their own message. For a deeper look at choice-based options, see the radio button options and dropdown options guides.
Step 4: Set an add-on price (optional)
Any option or value can carry an add-on price. Choose Fixed for a set money amount or Percent for a percentage of the product price. Both are live and reach checkout through a hidden companion product, so the charge works with Buy it Now and Shop Pay too.
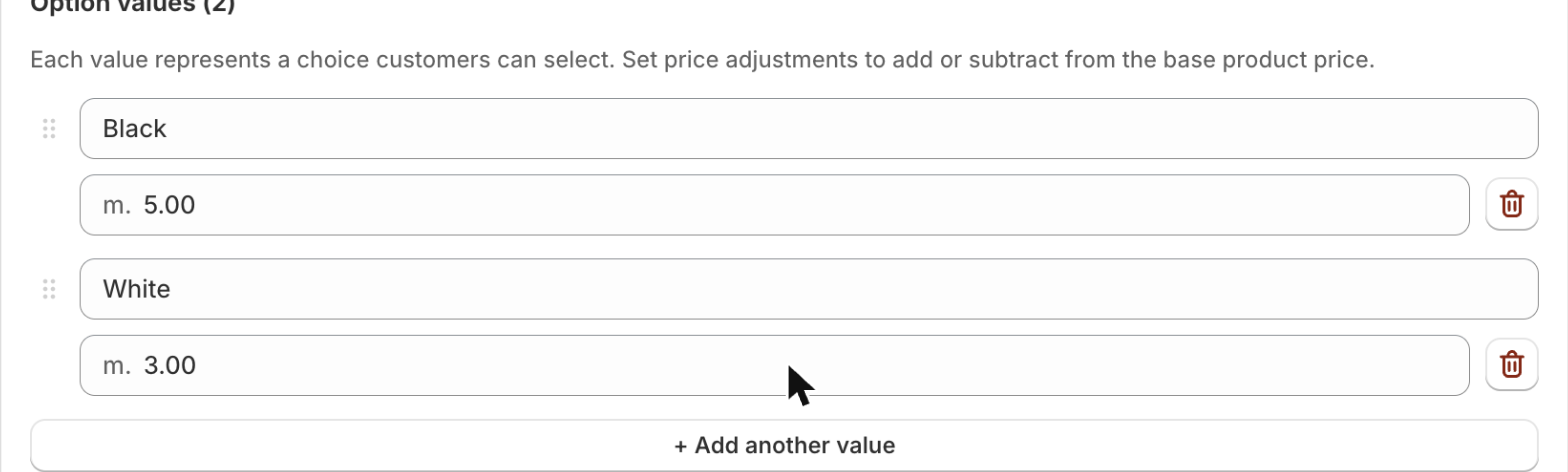 Adding a fixed or percent add-on price to an option or value
For a paid gift-wrap upgrade you might set a fixed +$5.00. For a premium material you might use a percentage so the upcharge scales with product price. Leave pricing empty for free options like a plain gift message. See pricing variants for strategy on fixed versus percent charges.
Step 5: Choose an assignment method
Decide where the option set appears using one of four assignment methods: All Products, Tagged Products, Collections, or Individual Products. This lives inside the option set, so one set can cover your whole catalog or a single item depending on what you pick.
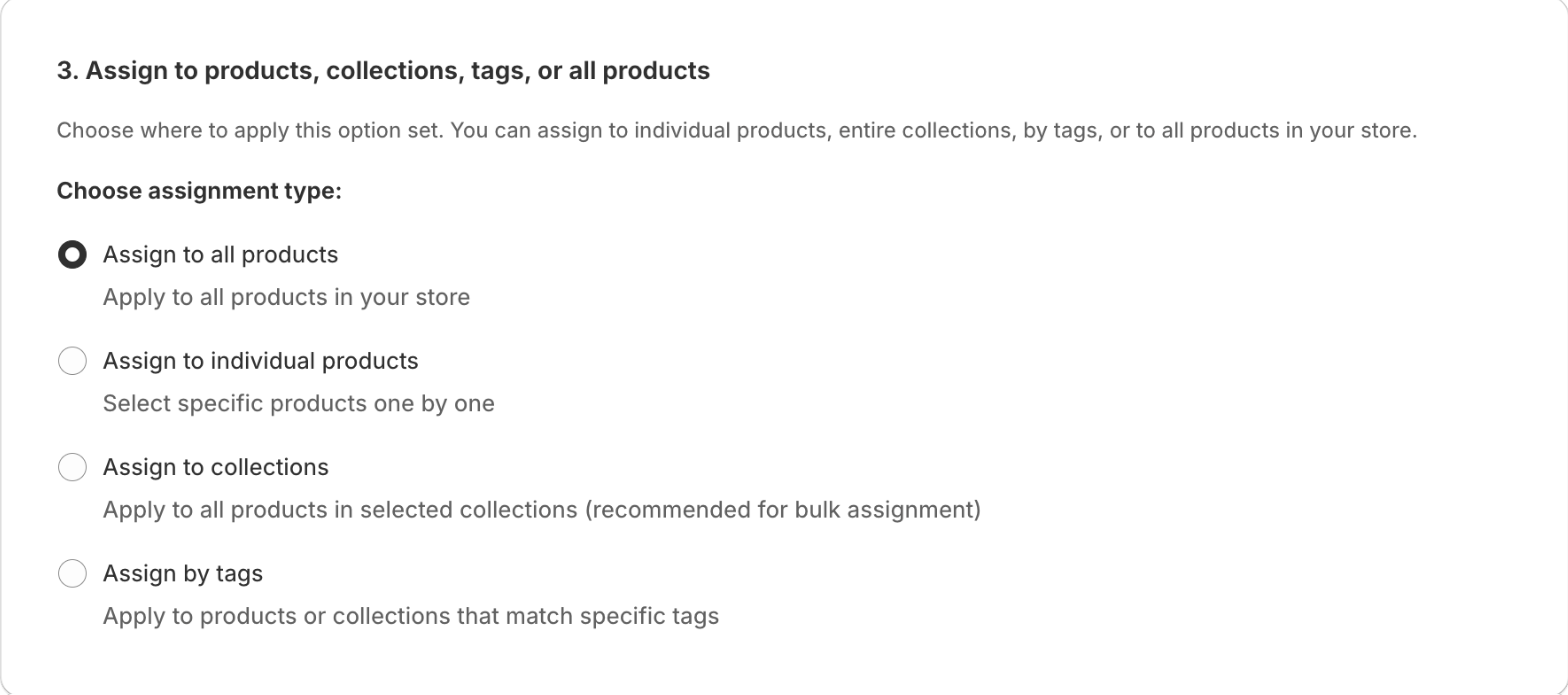 Choosing All Products, Tagged Products, Collections, or Individual Products
For a gift message you'd likely choose Tagged Products and target a tag such as gift-wrappable, or All Products if every item can be gifted. Read understanding assign types for help deciding between the four methods.
Step 6: Set the status to Active and save
Set the option set's status to Active so it can appear on the storefront; a Draft set stays hidden. Optionify has no separate "Publish" button. Instead, your changes are committed through Shopify's save bar at the top of the editor when you click Save.
 Set the status to Active and save with the Shopify save bar
If nothing shows up on your storefront later, the usual culprits are a Draft status, an option set not assigned to that product, or the Optionify theme app embed being turned off in your theme editor.
Step 7: Preview the option live
Once the set is saved and Active, click the Preview action. Optionify finds a product the set is assigned to and opens it on your live storefront, so you see the real rendering rather than a mockup. Preview needs an Active, assigned set because it loads an actual product page.
Check that the label reads clearly, any values look right, and add-on prices display as expected. If the option doesn't appear, confirm the theme app embed is enabled, as covered in getting started with Optionify.
How does option data reach my orders?
Every option a customer fills in is saved to the Shopify order as line item properties. Open the order in your Shopify admin and you'll see the exact text, selected values, dates, or uploads alongside the product, so your fulfillment team has everything they need to pack it correctly.
For our example, an order would list Gift Message: Happy Birthday, Sarah! right under the product. Any add-on charge you set also flows through to the order total via the companion product, keeping your accounting accurate.
FAQ
How do I add a product option in Shopify? Open Optionify, click Create option set, name it, add an option and choose one of 17 types, add values, optionally set an add-on price, pick an assignment method, set the status to Active, and save with the save bar. Then use Preview to see it live.
What is an option set in Optionify? An option set is a named group that holds one or more options and their values. You assign the whole set to products rather than individual options, so a single set can cover one product, a tag, a collection, or your entire catalog at once.
Can I charge extra for a product option? Yes. Any option or value can carry an add-on price, set as a fixed amount or a percentage of the product price. The charge reaches checkout through a hidden companion product, so it also works with Buy it Now and Shop Pay.
Why isn't my option showing on the product page? The most common causes are the option set still being in Draft, the Optionify theme app embed not being enabled, or the set not being assigned to that product. Set the status to Active, enable the embed in your theme editor, and confirm the assignment.
Do I have to save before previewing? Yes. Save your option set with the save bar first, and make sure its status is Active. Preview opens a real product the set is assigned to on your live storefront, so it needs the saved, active version to render correctly.
Get started with Optionify
You've now created an option set, priced an option, assigned it, and previewed it live, all on Optionify's free plan. There are no paid tiers, so every option type and feature is available from day one.
Install Optionify free on the Shopify App Store
Keep building with understanding assign types, add show/hide rules with conditional logic, or explore specific types like date picker options and file upload options.